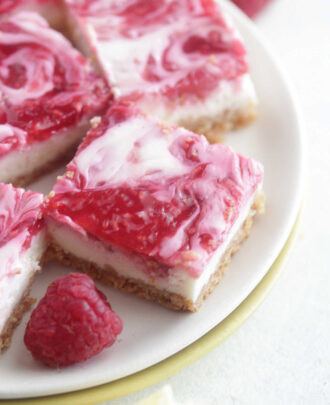
Tex Mex Quinoa Salad with Lime Vinaigrette

Tex Mex Quinoa Salad with Lime Vinaigrette

Let’s talk about quinoa today. I love it and probably don’t share nearly enough recipes with it on my blog. Quinoa is such a versatile ingredient. It’s a great sub for rice, but I have also used it in baking, and it’s even better in a salad! You guys already know how much I love all things Mexican, tex-mex, southwestern (whatever you want to call it!)! I have been really obsessed with black beans lately. I just can’t get enough of them and I want to put them in everything!

This tex-mex quinoa salad is perfectly light, but it still going to fill you up. I tossed in some of my favorite ingredients to add more texture, flavor, and color and then topped it off with a lime vinaigrette dressing. This quinoa salad would be great to eat as a side dish at a summer party, but it also works well just on its own for lunches!

Tex Mex Quinoa Salad with Lime Vinaigrette

Tex-Mex Quinoa Salad with Lime Vinaigrette

Prep Time: 20 minutes

Cook Time: 15 minutes

Total Time: 35 minutes

Yield: 4-6 servings

Ingredients

  • 1 cup uncooked quinoa, rinsed
  • 1/4 tsp. salt
  • 2 cups water
  • 1/3 of a medium-sized red onion, chopped
  • 1 15-ounce can black beans, drained and rinsed
  • 1 cup cooked fresh corn (you can boil it, grill it, however you want)
  • 1 cup grape tomatoes, sliced
  • 1/2 of a jalapeño pepper, seeded and finely chopped (optional)
  • 1 avocado, pitted and diced
  • 3 tbs. fresh chopped cilantro
  • salt to taste
  • For the dressing:
  • 2 tbs. fresh lime juice (add more if needed)
  • 3 tbs. olive oil

Instructions

  1. Put the water into a medium-sized pot. Stir in the salt and quinoa. Bring the water to a boil. Cover and continue to simmer until the quinoa has absorbed all of the water and is cooked (about 10-15 minutes). Remove from the heat and fluff with a fork. Transfer the quinoa into a large bowl or container. Let cool.
  2. Stir in the onion, corn, black beans, tomatoes, avocado, jalapeño, and the cilantro.
  3. In a small bowl, whisk together the lime juice and olive oil. Pour the dressing over the salad. Season with salt to taste and serve.
http://eat-drink-love.com/2013/06/tex-mex-quinoa-salad-with-lime-vinaigrette/

Tex Mex Quinoa Salad with Lime Vinaigrette

Crockpot Cheddar Beer Tacos

Crockpot Cheddar Beer Tacos

I’m in Orlando this week for a friend’s wedding and to visit with family so I am going to make this post quick!

My ranch chicken tacos are one of the most popular recipes on my blog. It’s such an easy recipe, but it is one of our favorite dinners to make. It’s a great weeknight meal since you use the slow cooker. I love meals that my husband can prep for us when I know I am going to have a long day at work.

Crockpot Cheddar Beer Tacos

I have had these cheddar beer tacos on my list for a while. Since we love the chicken ranch tacos so much, I figured this recipe would also be a hit. I was a little worried that the beer flavor would be overwhelming. I don’t hate beer, but it’s not my favorite (except for certain ones anyway) and my husband does not like it at all. I was pleasantly surprised to find that you really can’t taste the beer too much. The chicken is so moist and after tossing in some sharp white cheddar cheese, it’s taco heaven!

Crockpot Cheddar Beer Tacos

Crockpot Cheddar Beer Tacos

Prep Time: 5 minutes

Cook Time: 7 hours

Yield: 4-6 servings

Ingredients

  • 4 skinless and boneless chicken breasts
  • 3/4 cup beer (pale or amber ale)
  • 1 tbs. chili powder
  • 1 1/2 tsp. cumin
  • 1/2 tsp. paprika
  • 1/4 tsp. garlic powder
  • 1/4 tsp. onion powder
  • pinch of cayenne pepper
  • 1/2 tsp. salt
  • 1/2 tsp. pepper
  • 3/4 cup freshly grated cheddar cheese + more for topping (I used a sharp white cheddar)
  • taco shells
  • desired toppings

Instructions

  1. Place the chicken breasts into the crockpot.
  2. In a small bowl, mix together the chili powder, cumin, paprika, garlic powder, onion powder, cayenne pepper, salt and pepper.
  3. Measure out 3/4 cup of the beer. Stir in about 1 1/2 tbs. of the taco seasoning with the beer. Pour the mixture over the chicken. Cover and cook on low for 7-8 hours or on high for 4 hours.
  4. Remove the chicken from the crockpot and shred with a fork. Place the chicken back in with the liquid and it will absorb the liquid (about 10 minutes). You can add additional seasoning if needed.
  5. Right before you are ready to serve, stir in the cheddar cheese.
  6. Remove the chicken and put in a serving bowl. Make tacos with desired toppings!

Notes

Recipe from How Sweet It Is

If you do not want to use beer, you can swap for chicken broth!

http://eat-drink-love.com/2013/06/crockpot-cheddar-beer-tacos/

Crockpot Cheddar Beer Tacos

Strawberry Sangria

Strawberry Sangria

Oh, look, it’s another sangria recipe. I know what you are thinking, “Gosh, what’s up with this chick and sangria?” Well, I love it. Is that a good enough reason? I think it is.

Summer is totally sangria season and I love making as many varieties of sangria as humanely possible. If you searched for the word “strawberry” on this blog, you would probably find a gazillion recipes. Strawberries are my favorite fruit! And I can’t even tell you how wonderful wine-soaked strawberries are!

Strawberry Sangria

What I love about this sangria recipe is the addition of sparkling water. I am totally a white wine spritzer kind of gal, especially during the summer! I also added some rum for an extra kick. You can never go wrong with rum. My other favorite thing about this sangria? The color. These photos were taken right after I mixed it up, but if you let it sit for a couple of hours, it starts to turn a gorgeous pink color!

Oh, and just a side note: I just realized I don’t have any red wine sangria recipes! What’s up with that? Don’t worry, I will mix one up for you guys soon!

Strawberry Sangria

Strawberry Sangria

Prep Time: 20 minutes

Yield: about 6 servings

Ingredients

    For the strawberry syrup:
  • 1 pint fresh strawberries, stems removed and sliced
  • 2/3 cup sugar
  • 1/2 cup water
  • For the sangria:
  • 1 750-ml bottle white wine (chardonnay or a pinot work well)
  • 3 cups sparkling water
  • 1/2-2/3 cup white rum (optional)
  • About 2 cups sliced strawberries
  • Other fruits to add:
  • oranges
  • peaches
  • raspberries
  • lemons

Instructions

  1. Stir together the water and sugar in a medium sauce pan over medium heat. Add in the sliced strawberries. Bring the mixture to a light boil and allow for the strawberries to break down as much as possible (about 10 minutes), stirring occasionally. Use a fork or potato masher to help break down the strawberries. Remove from the heat. Pour the mixture through a sieve and into a glass pitcher or punch bowl and discard the solids. Allow for the syrup to cool completely.
  2. Pour the wine, sparkling water, and the rum in with the syrup and stir until everything is well-combined. Add in sliced strawberries (I used almost 1 pint) plus any other fruit you desire. Allow for the sangria to chill for at least 2 hours if not overnight.

Notes

If you plan to use any citrus fruits (orange, lemons, or limes), I recommend removing the peel if you plan to soak the fruit overnight. The rind tends to break down in the wine and can create a bitter taste.

http://eat-drink-love.com/2013/06/strawberry-sangria/

Strawberry Sangria

Other sangria recipes:
Spring Sangria
Peach Grapefruit Sangria
Summer Sangria

S’mores Brownies

S'mores Brownies

Oh sweet Lord in heaven of all things that are good in this world….these brownies. I don’t even know what to say about them.

They are kind of amazing.

We had another work potluck party last week and needed a dessert. I brought brownies to the last party and everybody seemed to really like them, so I wanted to try another brownie recipe. The theme for this potluck was All-American. Tell me, what dessert screams summer and is more American than s’mores?! Exactly. Nothing. Don’t even try to tell me anything else.

These brownies taste just like a s’more and you don’t need a campfire to make them! They have all of the essential components. Graham cracker crust? Check. Chocolately brownie layer? Double check. Ooey Gooey marshmallow layer? Oh heck yes! Even days later, the marshmallows are still perfectly gooey!

S'mores Brownies

The only thing I might do differently next time is do a slightly thinner graham cracker crust. I kind of wanted more brownie and less crust. But, since these still came out so good, I am giving you the recipe as I made it. If you want a thinner layer, go ahead and use a little less!

S'mores Brownies

S’mores Brownies

Prep Time: 15 minutes

Cook Time: 50 minutes

Total Time: 1 hour, 5 minutes

Yield: About 28-30 brownies

Ingredients

    For the graham cracker crust:
  • 2 1/2 cups graham cracker crumbs
  • 1/4 cup granulated sugar
  • 10 tbs. melted unsalted butter
  • For the brownies:
  • 6 tbs. unsalted butter
  • 6 ounces good quality bittersweet chocolate
  • 2 cups granulated sugar
  • 2 large eggs
  • 2 large egg yolks
  • 2 tsp. vanilla extract
  • 1 1/2 cups flour
  • 1/2 cup unsweetened cocoa powder
  • 1/4 tsp. salt
  • 1 10-ounce bag mini marshmallows

Instructions

  1. Preheat oven to 350 degrees. Line a 9x13 baking dish with foil leaving some extra hanging off the sides. Lightly grease or spray with non-stick spray and set aside.
  2. To prepare the graham cracker crust, melt the butter in a microwave-safe bowl. Mix in the graham cracker crumbs and the sugar with the melted butter. Spread the mixture into the bottom of the baking dish, pressing down to create a crust in an even layer. Bake the crust for about 15 minutes or until golden. Remove the pan from the oven and set aside.
  3. While the crust is baking, prepare the brownie batter. Prepare a double boiler by placing a pot filled about half way with water on medium high heat. Place a glass bowl over the pot. Melt the butter and the chocolate together, stirring constantly. Remove from the heat and let cool for a couple of minutes.
  4. Beat in the eggs, egg yolks, sugar, and vanilla extract. Stir in the flour and cocoa powder. Pour the brownie batter on top of the graham cracker crust. Bake for about 30-35 minutes or until a toothpick inserted comes out mostly clean.
  5. Switch the oven to broil. Pour the marshmallows over the brownies, arranging in an even layer. Place the pan into the oven and by watching very closely, broil until the marshmallows just begin to char. I highly recommend standing near the oven while you do this to ensure that the marshmallows do not burn, checking every 45 seconds or so.
  6. Remove from the oven and let the brownies cool completely. To remove, gently lift using the extra foil. Pull the foil away and cut into squares. Store in an airtight container.
http://eat-drink-love.com/2013/06/smores-brownies/

S'mores Brownies

Smirnoff Sorbet Light

Smirnoff Sorbet Light

Happy Friday! You guys know I love a good cocktail and today I have three great cocktails for you!

Smirnoff recently sent me a package with their new Sorbet Light line of vodkas! What I love about these vodkas is that they are infused with natural flavorings of berries, lemon, passion fruit and luscious mango! And you know what is even better than that? These vodkas have 25% less calories than the leading dessert-inspired vodkas out there at only 78 calories per serving!

Smirnoff Sorbet Light

All three flavors are so light and refreshing which makes them absolutely perfect for summer drinks! One of my biggest pet peeves about many fruity drinks is the sugar, which fruity drinks are notorious for. When it’s really hot outside, a cold fruity drink sounds so perfect and I really hate it when I take a sip of a drink and just taste ridiculous amounts of sugar. Sugar= calories. And who wants that during the summer months?! During the summer, I want drinks that are light and refreshing and the new Sorbet Light line of vodkas do just that! And considering all the fun summer parties and BBQs, I don’t want to drink my calories, I want to eat them!

These vodkas will give you that fruity flavor without all the sugar and calories. To keep drinks nice and light, I like to add a splash of soda, a splash of juice and lots of fresh citrus juice. You really don’t need to add tons of sugary juices to make a good cocktail! By keeping your drinks on the lighter side, you can indulge in all of those burgers and s’mores with a little less guilt!

The Mango Passion Fruit vodka is perfect if you are looking for a tropical-inspired cocktail. With some coconut water and pineapple juice mixed in, you’ll feel like your own your own little vacation!

Smirnoff Sorbet Light

The next one I tried was a lemon pomegranate punch with the Lemon Sorbet vodka. My husband and I both really liked this one. I’m crazy about anything that tastes like lemon and a lemony drink totally makes me think about summer!

Smirnoff Sorbet Light

And finally, the Raspberry Pomegranate. It was really a toss up between this one and the lemon vodka for which was my favorite! I actually decided to bring this one to a work party I had last night and everyone really liked how light and refreshing it was. And it’s so easy to mix up and it’s only 92 calories for a serving of the punch. You really can’t beat that!

Smirnoff Sorbet Light

Pomegranate Berry Punch

Prep Time: 5 minutes

Yield: 1 drink

Calories per serving: 92

Fat per serving: 0g

Ingredients

  • 1.5 oz. Smirnoff Sorbet Light™ Raspberry Pomegranate
  • 2 oz. diet ginger ale
  • 1 oz. cranberry juice

Instructions

  1. Combine all of the ingredients in a glass. Fill with ice and garnish with a lime wedge.

Notes

Recipe from Smirnoff

http://eat-drink-love.com/2013/06/smirnoff-sorbet-light/

To get other Sorbet Light recipes as well as other great cocktail ideas, please visit Smirnoff!

Smirnoff Sorbet Light

Disclosure: This post has been sponsored by Smirnoff Sorbet Light. While I was compensated for my work, all thoughts and opinions are my own.

Breakfast Cookies

Breakfast Cookies

Breakfast is one of those meals that has to happen every morning or I get really grumpy. The problem is that I often struggle with time in the mornings. While breakfast is important, sleep is even more important so the longer I can sleep, the better. Then after my alarm goes off, I pick up my phone and start going through emails and such and then oops, it’s 30 minutes later, I haven’t showered and I am then officially running late. I usually have time to eat a quick bowl of cereal, but it really sucks on the mornings where I don’t have time. I like to keep some things on hand that I can just grab and go and that will fill me up until lunch. These breakfast cookies do just that.

Who says you can’t have a cookie for breakfast?

Breakfast Cookies

Cookies for breakfast is one of the best ideas ever. Although nothing ever really beats a chocolate chip cookie, they aren’t really the best breakfast. I need something a little heartier and these cookies are it! Granted they aren’t pretty, but oh man, are they good!

These cookies contain no added sugar which makes them perfect for breakfast or even a snack. And at only 160 calories per cookie, you can even eat two! You can easily make them vegan or gluten-free as well.

Breakfast Cookies

Breakast Cookies

Prep Time: 10 minutes

Cook Time: 13 minutes

Total Time: 23 minutes

Yield: 10 cookies

Serving Size: 1 cookie

Calories per serving: 160

Fat per serving: 7.9

Ingredients

  • 2 medium ripe bananas, mashed
  • 1/4 cup melted coconut oil
  • 3 tbs. honey (or agave nectar to make vegan)
  • 1/2 cup oats
  • 1 cup dried fruit (I used blueberries, cranberries, and mango)
  • 1/2 cup sliced almonds
  • 1 1/2 tbs. ground flax
  • 1 tbs. chia seeds
  • 1/2 tsp. baking soda
  • pinch of salt

Instructions

  1. Preheat oven to 350 degrees. Line a cookie sheet with parchment paper or with a silicone mat.
  2. In a large bowl, stir together the mashed bananas, coconut oil, and the honey until well-combined.
  3. Stir in the oats, dried fruit, almonds, flax, chia seeds, baking soda, and the salt until everything is well-combined.
  4. Use a large cookie scoop or drop about 2 tbs. of the batter onto the cookie sheet for each cookie. Gently press down on the top of each one to flatten just slightly. Bake for about 11-13 minutes or until the cookies are slightly golden.

Notes

Please note that these cookies have a different texture than a regular cookie since there is no flour. The cookies will be soft with almost a muffin-like texture.

The final calories will depend on which dried fruits you decide to use. I used a mix from Trader Joe's that had blueberries, cranberries, and diced mango.

http://eat-drink-love.com/2013/06/breakfast-cookies/

Breakfast Cookies

Spicy Black Bean Burgers

Spicy Black Bean Burgers

I don’t know if it’s the change of weather or what, but lately I have been kind of turned off by all meat except chicken and turkey, and even then, I’m just meh about it right now.

When I was in the 8th grade, I decided to become a vegetarian and stayed that way until my freshman year of college. I don’t know what it was, but the taste and texture of all meat just turned me off and I couldn’t eat it anymore. I did occasionally have tuna which I guess really made me a pescetarian, but whatever. It drove my family crazy as they always had to make special accommodations for me. I lived off of side dishes, salads, and veggie burgers.

Spicy Black Bean Burgers

When I got to college though, I started thinking about giving chicken a try again. I was sitting around with some of my friends one night who were eating some fried chicken and it just smelled heavenly to me.  We were discussing getting an apartment together the following year so that we could get out of the dorms. I had also told them about my thoughts of eating meat again and that’s when they gave me an ultimatum.  They told me that I couldn’t live with them unless I tried to eat some chicken. I know, so rude…But, anyway, I did it. I couldn’t bear living in the dorms another year. I ate the chicken and they allowed me to live with them.

Despite bring meat back into my diet, I still typically eat vegetarian 2-3 times a week. Hubs wanted burgers for dinner the other night and while I was happy to oblige, I didn’t really want a beef burger. I wanted a black bean burger. A spicy black bean burger!

Spicy Black Bean Burgers

While my husband is a total carnivore and wouldn’t touch one of these burgers, I can tell you that you really won’t miss the meat when you bite into one of these! The black beans get roughly chopped in the food processor which gives them a meaty texture. And a blend of spices add a great flavor and give the burger a nice kick!

These burgers cook best when frozen since it helps the burger stay together. But since you are freezing them, you can make a bunch at once and just pull one out whenever you want one. These are great for a quick lunch or for dinner with a side of veggies or fries. My favorite topping is just sliced avocado and some sriracha mayo!

Spicy Black Bean Burgers

Spicy Black Bean Burgers

Yield: 4 patties

Serving Size: 1 burger

Ingredients

  • 1/3 medium yellow onion, cut into wedges
  • 1 can (15-ounces) black beans, drained and rinsed
  • 2 tsp. cumin
  • 1 tsp. chili powder
  • 1 tsp. garlic powder
  • 1/4 tsp. salt
  • 2 tsp. sriracha (can adjust amount or leave out)
  • 1 large egg
  • 1/2 cup panko bread crumbs
  • 4 hamburger buns
  • toppings of your choice

Instructions

  1. In the bowl of a food processor, add the onion wedges and chop. Pour in the black beans and pulse 2-3 times until the beans are just partially smashed (do not fully chop all of the beans).
  2. Pour the bean and onion mixture into a bowl. In a small bowl, mix together the cumin, chili powder, garlic powder, and the salt. Add the egg, spice mix, and the sriracha in with the bean mixture. Mix well. Stir in the panko crumbs until everything is well-combined. Form the mixture into four evenly-sized patties with your hands.
  3. Cut up some wax paper into 3 squares (about the size of the patties). Stack the patties, placing a square of the wax paper in between each patty and place into a freezer bag or container. Freeze for at least 2 hours before cooking.
  4. If using a grill pan, spray with non-stick spray. Cook the burger for about 7 minutes per side. You can also bake the burgers if desired (bake at 375, you may need to cook them for a little longer if baking, though I have not tried baking these yet).
http://eat-drink-love.com/2013/06/spicy-black-bean-burgers/

Spicy Black Bean Burgers

Low-Fat Vanilla Bean Ice Cream

Low-Fat Vanilla Bean Ice Cream

When it comes to ice cream, I usually go for the fancy flavors. Anything stuffed with nuts, cookie dough, cake batter, whatever! Those are my favorite. But, sometimes there is nothing better than just plain vanilla ice cream, especially vanilla bean ice cream!

Low-Fat Vanilla Bean Ice Cream

And guys, I’m just gonna tell you right now that this is THE best vanilla bean ice cream I think I have ever had. For reals. And you know what? It’s also lower in fat! This ice cream is perfectly dreamy and creamy and I am madly in love with those little black specks of vanilla beans. Vanilla beans are just magical, don’t you think?

Low-Fat Vanilla Bean Ice Cream

Another thing I love about this ice cream is that it is quicker to make than other recipes. Typically, you have to let the custard set before finally pouring it into the ice cream maker which usually requires letting it set in the fridge overnight. This recipe lets you pour straight into the ice cream maker.

If you don’t have an ice cream maker, I highly recommend investing in one! You can get one for under 60 bucks and there is really nothing better than homemade ice cream.

Pour some chocolate syrup on top and pile on the sprinkles and you’ll have pure happiness in a bowl!

Low-Fat Vanilla Bean Ice Cream

Low-Fat Vanilla Bean Ice Cream

Prep Time: 25 minutes

Total Time: 4 hours

Yield: 8 servings

Serving Size: 1/2 cup

Calories per serving: 161

Fat per serving: 5.9g

Ingredients

  • 1 cup half-and-half
  • 1/2 cup sugar
  • 2 tbs. light-colored corn syrup
  • 1/8 tsp. salt
  • 1 (12-ounce) can low-fat evaporated milk
  • 1 vanilla bean, split lengthwise
  • 3 large egg yolks

Instructions

  1. In a medium saucepan, combine the half-and-half, 1/4 cup of the sugar, corn syrup, salt, and the evaporated milk. Scrape the seeds from the vanilla bean and add the seeds and the bean into the mixture. Heat until the mixture reaches 180 degrees (or until tiny bubbles start to form around the edges; do not boil). Remove from the heat, cover and let stand for 10 minutes. Discard the bean.
  2. In a bowl, whisk together the egg yolks and the remaining sugar. Gradually add in the milk mixture, stirring constantly. Pour the milk mixture back into the sauce pan and cook over medium heat until the mixture reaches 160 degrees stirring constantly. Remove the pan and place into a large bowl filled with ice. Allow the mixture to cool for about 20 minutes or so, stirring occasionally.
  3. Pour the mixture through a fine mesh sieve and into the bowl of an ice cream maker, discard the solids. Freeze according to the manufacturer's instructions. Spoon the ice cream into a freezer-safe container, cover, and freeze for at least 3 hours.

Notes

Recipe from Cooking Light

http://eat-drink-love.com/2013/05/low-fat-vanilla-bean-ice-cream/

Low-Fat Vanilla Bean Ice Cream

Classic Macaroni Salad

Classic Macaroni Salad

Is it totally weird that we had risotto for dinner on Memorial Day? I spent the day making recipes, photographing, doing some reading for work and then my husband made risotto for dinner. Totally not typical Memorial Day food, but oh well. I guess we are a little weird like that.

Let’s talk about a food you might actually eat at a summer BBQ- good ol’ classic macaroni salad. Macaroni salad that is typically drowning in mayo, that is. I think I have told you guys about a bazillion times now how I HATE when pasta and potato salads are drowning in mayonnaise. Seriously, I hate it. It makes me want to gag.

Classic Macaroni Salad

I wanted to give the classic macaroni salad a little makeover. Typically, aside from some chopped onion and diced peppers, you don’t see a lot of veggies in the classic macaroni salad, so I threw in some fresh chopped broccoli, grape tomatoes, and peas to change things up a bit. Not only does it make the dish a little more nutritious, it adds a nice pop of color! I reduced the mayo and used light mayo and mixed in some fat free Greek yogurt. This pasta salad is light, but it’s also nice and creamy at the same time!

Classic Macaroni Salad

Macaroni Salad

Prep Time: 20 minutes

Cook Time: 10 minutes

Total Time: 30 minutes

Yield: 8 servings

Calories per serving: 165

Fat per serving: 3.6g

Ingredients

  • 1/2 lb. elbow macaroni (any brand will do; I used whole grain pasta)
  • 3 tbs. fat free plain Greek yogurt
  • 1/2 cup light mayo (I used the kind made with olive oil)
  • 2 tbs. cider vinegar (or red wine vinegar)
  • 1 1/2 tsp. mustard powder
  • 1 tsp. garlic powder
  • salt and pepper to taste
  • 2 cups chopped fresh broccoli florets
  • 2 cups sliced grape tomatoes
  • 1 cup cooked green peas

Instructions

  1. Cook the pasta in a pot of salted boiling water according to the package directions. Drain and pour the pasta to a large bowl or container.
  2. In a bowl, whisk together the Greek yogurt, mayo, vinegar, mustard powder, garlic powder and some salt and pepper.
  3. Add the veggies to the pasta. Pour in the dressing and mix until the pasta and veggies are all coated with the dressing. Season with additional salt and pepper if necessary.

Notes

Feel free to add different veggies if desired - diced peppers and celery would also be great in this salad!

http://eat-drink-love.com/2013/05/classic-macaroni-salad/

Classic Macaroni Salad

Coconut French Toast with Tropical Fruit Topping

Coconut French Toast with Tropical Fruit Topping

The last real vacation I had was three years ago when we went to Alaska on our honeymoon. I’ve been dreaming of another cruise well…pretty much since we got off the boat for the last one. Some place tropical, where I actually won’t care that it’s ridiculously hot, fruity drink in hand.

But, alas, here I must stay!

Last week I asked you guys on Facebook whether you preferred pancakes, waffles, or French toast. The winner was most definitely French toast. I realized that I only had one French toast recipe on this blog. I love to give you peeps what you want so I have another French toast recipe for you today!

Coconut French Toast with Tropical Fruit Topping

And this French Toast recipe is certainly going to make you feel like you are on vacation. What makes this French toast special is that instead of regular milk, this French toast is soaked in coconut milk overnight and then topped with shredded coconut and baked until golden. And to top it off, a big scoop of tropical fruit! It’s sweet enough that you won’t need any syrup. And at least for breakfast, you’ll feel like you are on a tropical vacation!

Coconut French Toast with Tropical Fruit Topping

Coconut French Toast with Tropical Fruit

Prep Time: 8 hours

Cook Time: 30 minutes

Total Time: 8 hours, 30 minutes

Yield: 4 servings

Serving Size: 2 slices

Ingredients

    French toast:
  • 8 slices French bread (cut diagonally and about 1-inch thick)
  • 1 cup light coconut milk
  • 3 eggs
  • 1/4 cup sugar
  • 1/8 tsp. salt
  • 2 tsp. vanilla extract
  • 1/2 cup unsweetened flaked coconut
  • Tropical fruit topping (see note):
  • 1 cup diced pineapple
  • 1 1/2 cups chopped and peeled mango
  • 1 cup chopped and peeled papaya
  • 1 tbs. sugar (optional)
  • 1 tbs. fresh lime juice

Instructions

  1. Spray a 9x13 baking dish with cooking spray. Arrange the bread in a single layer.
  2. In a bowl, whisk together the coconut milk, eggs, sugar, salt, and vanilla extract. Pour the mixture over the bread slices. Turn the slices over to get both sides of each piece coated in the coconut milk mixture. Cover and refrigerate overnight.
  3. Preheat oven to 350 degrees. Remove the bread from the fridge. Sprinkle the flaked coconut evenly over the slices of bread. Let sit for about 10 minutes.
  4. Bake for 25 minutes, uncovered, or until the flaked coconut is golden.
  5. While the French toast is baking, prepare the tropical fruit topping in a bowl. Refrigerate until ready to serve. Spoon on top of the French toast when it is done baking and serve.

Notes

I found a package of peeled and sliced tropical fruit from Trader Joe's and I just chopped the slices. You can really use however much and whichever types of tropical fruit you prefer. Kiwi would also be a great addition!

http://eat-drink-love.com/2013/05/coconut-french-toast-with-tropical-fruit-topping/

Coconut French Toast with Tropical Fruit Topping